一、官网学习
本文内容基于官方文档 + 其它资料 + 自己的使用经验整理。
Spring Security 是一个框架,提供针对常见攻击的身份验证、授权和保护。 它为保护命令式和响应式应用程序提供了一流的支持,是保护基于 Spring 的应用程序的事实标准。
在 Security 5.4 中引入了通过创建 SecurityFilterChain Bean 进行配置 HttpSecurity 的功能。自 Security 5.7 开始,WebSecurityConfigurerAdapter 弃用,其配置写法以 Java Bean 的方式为主,组件化配置。具体的使用可以阅读 官方文档。
1. 架构
Spring Security 基于 servlet 的过滤器链实现,这些过滤器称之为 FilterChain,同时 Security 还提供了 FilterChainProxy 允许我们设置多个 FilterChain,实现不同的认证,例如基本的认证和 OAuth2 等。在这些过滤器中,我们可以选择重写内部的具体实现完成自己的业务,也可以向 FilterChain 中添加我们自己的新的 Filter,然后在配置中添加生效的位置。

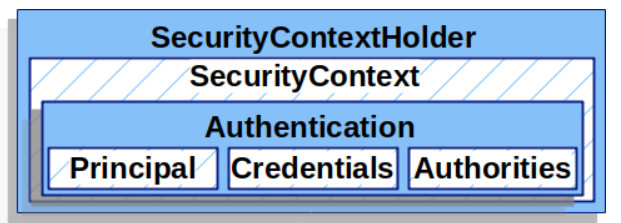
SecurityContextHolder:存储身份验证者的详细信息的地方;
SecurityContex:从 SecurityContextHolder 获取,包含当前经过身份验证的用户 Authentication;
Authentication:可以是 AuthenticationManager 的输入,用于提供用户为进行身份验证而提供的凭据或 SecurityContext 中的当前用户;
AuthenticationManager:定义 Spring Security 的过滤器如何执行身份验证的 API;
ProviderManager:最常见的 AuthenticationManager 实现;
用户已通过身份验证的最简单方法是直接设置 SecurityContextHolder;
1 | // 创建信息的 context |
2. 思考
- 为什么在 SpringBoot 中,引入 Spring Security 依赖之后没有任何配置所有的请求就要认证呢?
SpringBootWebSecurityConfiguration,自动配置类 - 在项目中明明没有登录界面,登录界面怎么来的呢?
访问接口时,在引入 spring security 之后会先经过一系列过滤器。在请求到达 FilterSecurityInterceptor 时,发现请求并未认证,请求拦截下来,并抛出 AccessDeniedException 异常。抛出的异常会被 ExceptionTranslationFilter 捕获,这个 Filter 中会调用 LoginUrlAuthenticationEntryPoint#commence 方法给客户端返回 302,要求客户端进行重定向到/login页面。客户端发送/login请求。/login请求会再次被拦截器中 DefaultLoginPageGeneratingFilter 拦截到,并在拦截器中返回生成登录页面。 - 为什么使用 user 和控制台打印的密码能登录,登录时验证数据源存在哪里呢?
Spring Security中有一个基于内存(InMemoryUserDetailsManager)的默认用户实现。
二、登录认证
登录
- 调用 ProviderManager 的方法进行认证,如果认证成功生成 jwt,把用户信息存入到一个地方(可以是本地缓存,也可以是 redis 等)。
- 自定义 UserDetailsService 实现类,查询数据库
校验
定义 jwt 认证过滤器,获取 token,解析 token 中的 userid,查询 redis 中是否存在相应的 userid 并获取用户信息,最后存入 SecurityContextHolder。
1. 一些说明
AuthenticationManager ProviderManager AuthencationProvider关系
AuthenticationManager 有全局的和局部的,无论哪种,都是通过 ProviderManager 进行实现。每一个 ProviderManager 中都代理一个 AuthenticationProvider 列表,列表中每一个实现代表一种身份认证方式。认证时底层数据源调用 UserDetailsService 来实现。
WebSecurityConfigurerAdapter(5.7+ 标为弃用)
WebSecurityConfigurerAdapter 是 Spring Security 为我们提供的扩展类,方便我们重写默认配置,实现定制。
Spring Security(5.7) 中的 WebSecurityConfigurerAdapter 标记为弃用状态。新版的改变与使用参考 5.7新版配置,不同之处在于改变了写法,新版主要以配置 Bean 的方式 + 流式写法使用。
UserDetails
提供核心用户信息,UserDetailsService#loadByUsername() 返回的就是一个 UserDetails 对象。
UserDetailsService 用来修改默认认证的数据源信息
UserDetailsService 接口下有许多的实现。同时,此接口也方便了我们以后的自定义数据源的扩展。里面定义了一个根据用户名查询用户信息的方法。
Authentication
封装的用户信息,包括用户名和密码。
2. 配置AuthenticationManager的两种方式
-
继承 WebSecurityConfigurerAdapter,springboot 对 security 默认配置中 在工厂默认创建 AuthenticationManager。
1
2
3
4
5// 默认配置会自动发现创建的 UserDetailService 的 Bean
public void initialize(AuthenticationManagerBuilder builder, DataSource datasource) {
System.out.println("spring boot 自动配置的全局 AuthenticationManager");
} -
自定义全局认证数据源
1
2
3
4
5
6
7
8
9
10// 自定义配置 AuthenticationManager
public void configure(AuthenticationManagerBuilder builder) {
builder.userDetailsService(customerUserDetailsService())
}
// 暴露本地的 AuthenticationManager 自定义实例
public AuthenticationManager authenticationManagerBean() throws Exception {
return super.authenticationManagerBean();
}
小结:
- 默认自动配置全局 AuthenticationManager 默认找当前项目中是否存在自定义 UserDetailService 实例,如果存在会自动将当前项目的 UserDetailService 实例设置为数据源。
- 默认自动配置全局 AuthenticationManager 在工厂中使用时直接在代码中注入即可。
- 一旦通过自定义的方式配置后,会 自动覆盖 默认的实现;并且需要在实现中 指定 自定义的数据源对象 UserDetailsService 实例,并且这个 AuthenticationManager 需要暴露出来(自定义的默认是本地的,不允许其它组件注入)。
3. 密码加密
常见加密方案:Hash 算法+盐
单向自适应函数(占用大量系统资源,每个认证请求都会大大降低应用程序的性能),开发者可以通过 bcrypt、PBKDF2、sCrypt 以及 argon2 来体验这种自适应单向函数加密。
密码的认证是由 PasswordEncoder 进行的,他可以根据不同的加密实现不同的认证方式,所以非常的灵活。自定义密码加密有两种方式,一种是直接指定密码加密的方式(比如Bcrypt),另一种是使用自定义升级的方式。配置中指定密码加密的方式较为常见,另一种方式看自己的项目中是否需要,有需要就可以修改。
4. RememberMe
RememberMe是一种服务端的行为,并非是把用户名密码保存在 Cookie 中的信息。传统的登录方式基于 Session 会话,一旦用户的会话过期,就要再次登录,这样就太过于繁琐。如果有一种机制,会话过期后,还能继续保持认证状态,就会方便很多,RememberMe就是为了解决这一需求而生的。
具体的实现思路就是通过 Cookie 来记录当前用户身份,用户登录成功之后,会通过一定算法,将用户信息时间戳等进行贾母,加密完成后,通过响应头带回前端存储再Cookie中,当浏览器会话过期之后,如果再次访问网站,会自动将 Cookie 中的信息发送给服务器,服务器对 Cookie 中的信息进行校验分析,进而确定出用户的身份,Cookie 中所保存的用户信息也是有失效的,例如三天、一周等。
5. 会话管理(SessionManagementFilter)
会话并发管理:简单来说,就是多个客户端使用同一账户登录。默认情况下,同一账户可以再多少设备上登录并没有限制,我们可以在 Spring Security 中进行配置。
开启会话管理
1 | // 自定义配置 |
Spring Security 开启会话管理默认的是挤掉另一个客户端登录;我们可以设置为禁止其它客户端登录(当前用户登录成功,其它客户端无法使用当前的账户登录,除非当前用户注销退出)。集群下的会话管理可以使用 Redis 的Session 共享。
6. 跨域问题
-
入门:@CrossOrigin
该注解由 Spring 框架提供,含有属性:
allowCredentials:浏览器是否应当发送凭证信息,如 Cookie。
allowHeader:允许访问头
origins:允许指定访问的所属域访问,*表示所有字段。
exposeHeaders:哪些响应头可以作为响应的一部分暴露出来。使用通配符无效。
maxAge:预检查请求的有效期,有效期内不必再次发送预检请求,默认是100s。
methods:允许的请求方法,*表示所有方法。 -
进阶:addCrosMapping(Spring MVC 提供)
1
2
3
4
5
6
7
8
9
10
11
12
public class WebMvcConfig implements WebMvcConfigurer {
public void addCorsMappings(CorsRegistry registry) {
registry.addMapping("/**")
.allowCredentials(false)
.allowedHeaders("*")
.allowedMethods("*")
.allowedOrigins("*")
.maxAge(3600);
}
} -
CrosFilter(Spring Web提供的跨域处理解决方案)
1
2
3
4
5
6
7
8
9
10
11
12
13
14
15
16
17
18
19
20
21
22
23
24
25import org.springframework.boot.web.servlet.FilterRegistrationBean;
import org.springframework.context.annotation.Configuration;
import org.springframework.web.cors.CorsConfiguration;
import org.springframework.web.cors.UrlBasedCorsConfigurationSource;
import org.springframework.web.filter.CorsFilter;
import java.util.Arrays;
public class WebMvcConfig {
FilterRegistrationBean<CorsFilter> corsFilter() {
FilterRegistrationBean<CorsFilter> registrationBean = new FilterRegistrationBean<>();
CorsConfiguration corsConfiguration = new CorsConfiguration();
corsConfiguration.setAllowedHeaders(Arrays.asList("*"));
corsConfiguration.setAllowedMethods(Arrays.asList("*"));
corsConfiguration.setAllowedOrigins(Arrays.asList("*"));
corsConfiguration.setMaxAge(3600L);
UrlBasedCorsConfigurationSource source = new UrlBasedCorsConfigurationSource();
source.registerCorsConfiguration("/**", corsConfiguration);
registrationBean.setFilter(new CorsFilter(source));
registrationBean.setOrder(-1);
return registrationBean;
}
} -
Spring Security中的跨域解决方案
Q: 当项目中使用了Spring Security后,上面的方案有的会失效,有的可以继续使用,这是为什么?
A: 通过@CrossOrigin注解或者重写addCorsMappings方法配置的跨域解决方案,统统失效了(发送的预检请求会被 Spring Security 拦截);通过 CorsFilter 配置的跨域,有没有失效则要看过滤器的优先级。如果过滤优先级高于 Spring Security 过滤器,即先于 Spring Security 过滤器执行,则 CorsFilter 所配置的跨域处理依然有效;如果优先级低于 Spring Security 过滤器,则 CorsFilter 所配置的跨域处理就会失效。1
2
3
4
5
6
7
8
9
10
11
12
13
14
15
16
17
18
19
20
21
22
public class WebMvcConfig extends WebSecurityConfigurerAdapter {
protected void configure(HttpSecurity http) throws Exception {
http.authorizeRequests().anyRequest()
.authenticated().and()
.formLogin().and()
// 跨域处理方案
.cors().configurationSource(corsConfigurationSource()).and()
.csrf().disable();
}
CorsConfigurationSource corsConfigurationSource() {
CorsConfiguration corsConfiguration = new CorsConfiguration();
corsConfiguration.setAllowedHeaders(Arrays.asList("*"));
corsConfiguration.setAllowedMethods(Arrays.asList("*"));
corsConfiguration.setAllowedOrigins(Arrays.asList("*"));
corsConfiguration.setMaxAge(3600L);
UrlBasedCorsConfigurationSource source = new UrlBasedCorsConfigurationSource();
source.registerCorsConfiguration("/**", corsConfiguration);
return source;
}
}
7. 异常处理
7.1 认证异常
认证异常涉及的异常类型比较多,AuthenticationException 是所有认证异常的父类。一般我们重写 AuthenticationEntryPoint#commence() 来自定义出现认证异常后返回给前端的提示信息。
7.2 授权异常
相较于认证异常,权限异常类就要少了很多。在实际项目开发中,如果默认提供的异常无法满足需求,就需要根据实际需求自定义异常类。一般重写 AccessDeniedHandler#handle() 实现授权失败的返回信息。
7.3 自定义异常处理配置示例
为求简单,这里给的是一个使用 lambda 函数的简写形式,没有写单独的类配置。
1 |
|
8. CSRF(Cross-site request forgery)
CSRF 即跨站请求伪造,是 web 常见的攻击方式之一。
Spring Security 防止 CSRF 攻击的方式就是通过 csrf_token,前端发起请求的时候需要携带这个 csrf_token,后端会有过滤器进行校验,如果没有携带或者是伪造的就不允许访问。
CSRF 攻击依靠的是 Cookie 中所携带的认证信息。但是在前后端分离的项目我们的认证信息是基于 Token,而 token 并不存储在 Cookie 中,我们的 token 是设置到请求头中的,所以 CSRF 攻击在前后端分离的项目中就失效了。
二、授权
2.1 两种权限管理策略
-
基于过滤器的权限管理(FilterSecurityInterceptor):主要拦截Http请求,拦截下来后,根据Http请求地址进行权限校验
-
基于方法的权限管理(MethodSecurityInterceptor):主要是用来处理方法级别的权限问题。当需要调用某一个方法时,基于 AOP 将操作拦截下来,然后判断用户是否具备相关的权限。
1. 基于 URL 的权限管理
-
antMatchers():最早出现的,用于任何 HttpMethod 请求列表。
-
mvcMatchers():4.x 版本新增的,使用 Spring MVC 的匹配规则。例如,路径
/path,它会匹配/path,/path/,/path.html等。如果 Spring MVC 不会处理当前请求,会使用 antMatchers()。两种方式本质上没有太大区别。使用 mvcMatchers() 的话优先使用 MVC 进行匹配,如果匹配不到,会使用 antMatchers() 匹配方式。
-
regexMatchers();支持正则表达式。
2. 基于方法的权限管理
这种方式就是在 controller 层的方法上加上注解,指明需要哪些权限或者具有的角色才能访问对应的资源。
首先,配置类中开启方法权限校验:@EnableGlobalMethodSecurity(prePostEnabled = true, SecuredEnable = true, jsr250Enabled = true),(这里开启了三种方式,一般只用第一种)
1 | // 开启配置 启用方法级别的权限认证 |
项目中,一般前四个用的较多,后面几个功能较为单一。
2.2 动态权限修改
以上方式都是通过代码实现的,比较难以修改,可以使用动态的权限修改,比如从数据库层面实现,修改字段即可达到修改相应的权限的目的。
只需实现 FilterInvocationSecurityMetaSource 接口并重写 getAttributes() 方法。之后在 SecurityConfig 配置类中,使用 http.apply() 方法,覆写里面的配置,setSecurityMetaSource() 改为实现 FilterInvocationSecurityMetaSource 接口的实现类即可。setRejectPublicInvocations() 设为 true/false,为 true 时拒绝 公共资源(没有权限管理的公共接口) 的访问。
2.3 RBAC(Role-Based Access Control)
RBAC 即基于角色的权限控制,你也可以理解为使用 角色 来代理具体的 菜单访问权限。权限系统可以保护某些接口不被其它人滥用,从而提升系统的安全性。也可以简单理解为专门为某一部分人开放的特权。现在的权限管理基本都是基于 RBAC(Role Base Access Control)或者 RBAC 的变体,但其本质相差不大,落到实地的话就是表之间的关联关系较多较杂。
想像一下,每次添加用户时都单独添加权限的话,那肯定是比较繁琐的(毕竟世界的法则逃不过二八定律)。如果我们加入一个“角色”,把常用的一些权限分配给预定义的角色,然后在添加用户的时候直接把“角色”(比如 admin)设置给用户,这个用户就自动拥有对应的权限。这样就比较简单方便。
高级权限、特别权限、定制权限只是少部分人才能拥有的。但是像浪子一样的普通用户有很多,基数较大,拥有的权限并无太大的变化。当新用户注册的时候,每次手动给用户授权,开放一个一个的权限则会浪费很多的时间(一个一个是因为某些系统的权限系统粒度较小)。当然这部分也可以每次授权的时候选择默认值,然后根据不同的用户再进行不同权限的选择,这样如果权限发生变动维护起来较为麻烦。
RBAC 模型就提供了一种较好的实现:先把对应的权限(比如访问路径、操作菜单等)赋给一个角色,用户需要什么权限,就关联一个角色。如果用户需要更改权限,直接修改用户-角色的关联关系即可自动继承角色对应的权限。不仅节省时间,还利于维护。
所以这样看起来,RBAC 也是一种代理模式,角色充当了多个权限的代理,用户通过这个代理可以访问对应的资源。
固定权限 + 定制权限:一般对于系统来讲,我们需要分部门,部门拥有的权限都是固定的,然后对于里面的成员处于不同的岗位将会拥有不一样的权限。这样就多出了两个分支:部门、岗位。
我们可以把部门视作用户组,而岗位就是把用户组的用户再细分一次。这就是 RBAC 模型的变种之一。
三、最佳实践
没有最佳实践,只有按需实现,如果需要参考,请参阅:https://github.com/jhlzlove/ruoyi-olive/blob/main/olive-framework/src/main/java/com/olive/framework/config/SecurityConfig.java